Thursday, November 20, 2014

FDM - Mapping Tables

Mapping Tables map source members to target members in FDM applications. There are 5 types of mappings.
  • Explicit Mappings
  • Between Mappings
  • In Mappings
  • Like Mapping
  • Conditional Mapping 
1. Explicit Mappings: one to one mapping. For example, source account 1100 will map to target account 10010101

Tips: You can define the Target Account as "IGNORE", then FDM will ignore all the data records with the source account defined in this rule in the source file. (e.g. records with 1300-101 source account will be ignore when load data to the target system.) You can do that in other types of mappings as well.

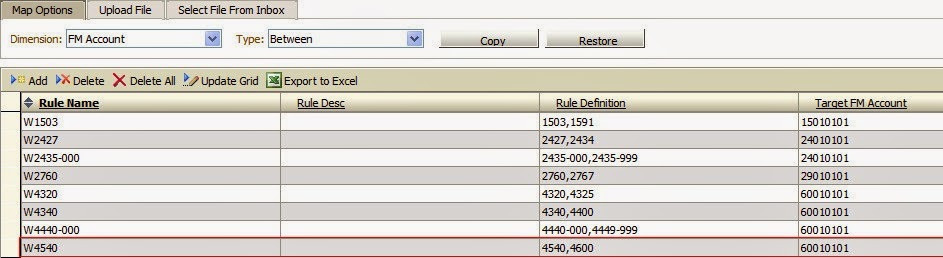
2. Between Mappings: many to one mapping. For example, source account in the range 1503~1591 will map to target account 15010101

 3. In Mappings: many to one mapping. For example, source account 1503, 1510 and 1515 will map to target account 15010101


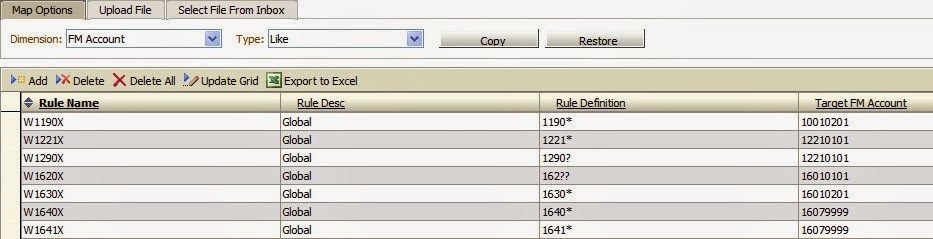
 4. Like Mapping: many to one/many mapping. For example, all the source account start with 1190 will map to account 10010201


You can also define the same wildcard characters (* and ?) in both source and target members so that it will be considered to be automap. For example,


 5. Conditional Mapping: many to many mapping. You can define this type of mapping in Between, In or Like mappings.

When add a new line of the mapping, input "#Script" in the Target field. And then click "Zoom" in the Script field.


You can use a VB script to define a conditional mapping.


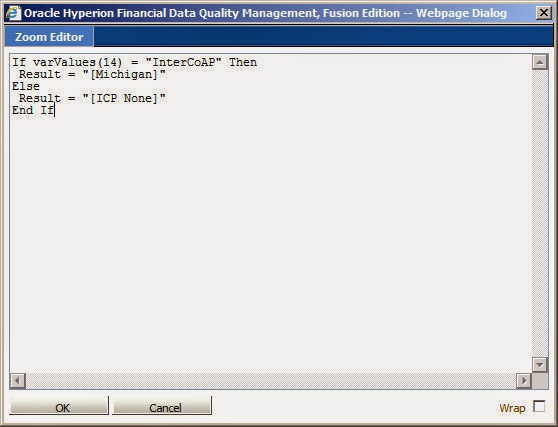
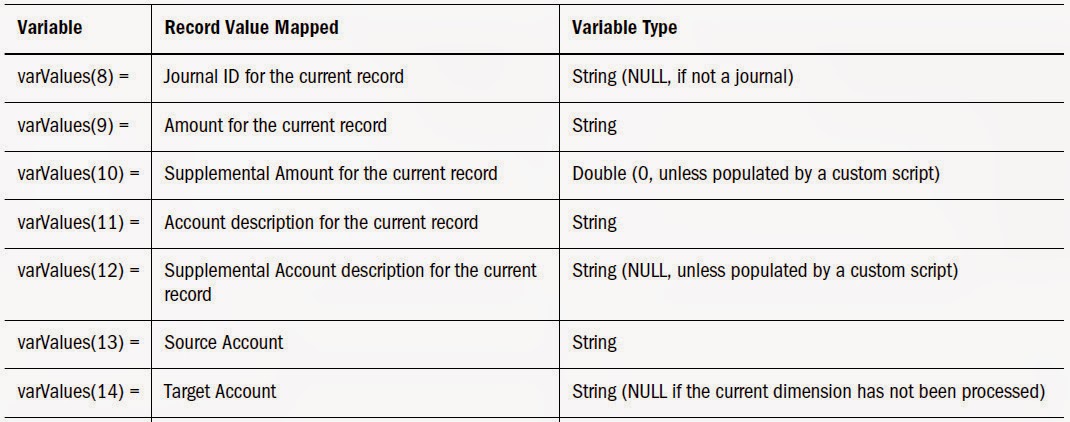
varValues(14) is one of the preset variables that are available for use in conditional script expressions, you can find the meaning of the variables in the FDM admin guide.


This ICP mapping means, if the target account equals "InterCoAP" then return ICP as "[Michigan]". In other cases, return ICP as "[ICP None]". The conditional mapping will be as below,


If a source value is used with multiple map types, FDM processes the maps in the following order:
  1. Explicit
  2. Between
  3. In
  4. Like
Explicit maps override all other map types. Between maps override In and Like maps. In maps override Like maps.

By default, FDM maps are sorted alphabetically, from within the Rule Name column. To enable FDM to sort and process maps by numeric value, you enable map sequencing. If a source account is valid within multiple maps of one mapping type, the source account is assigned to


For the dimensions order, FDM processes in the following order by default,
  1. Account
  2. Entity
  3. ICP
  4. Custom1...Custom20
/*------------------------------------------------------------------------------------------------------------------*/

Mapping Tables can be export and import. I don't like to use the MapLoader, instead, I use Import XLS to import mapping tables.

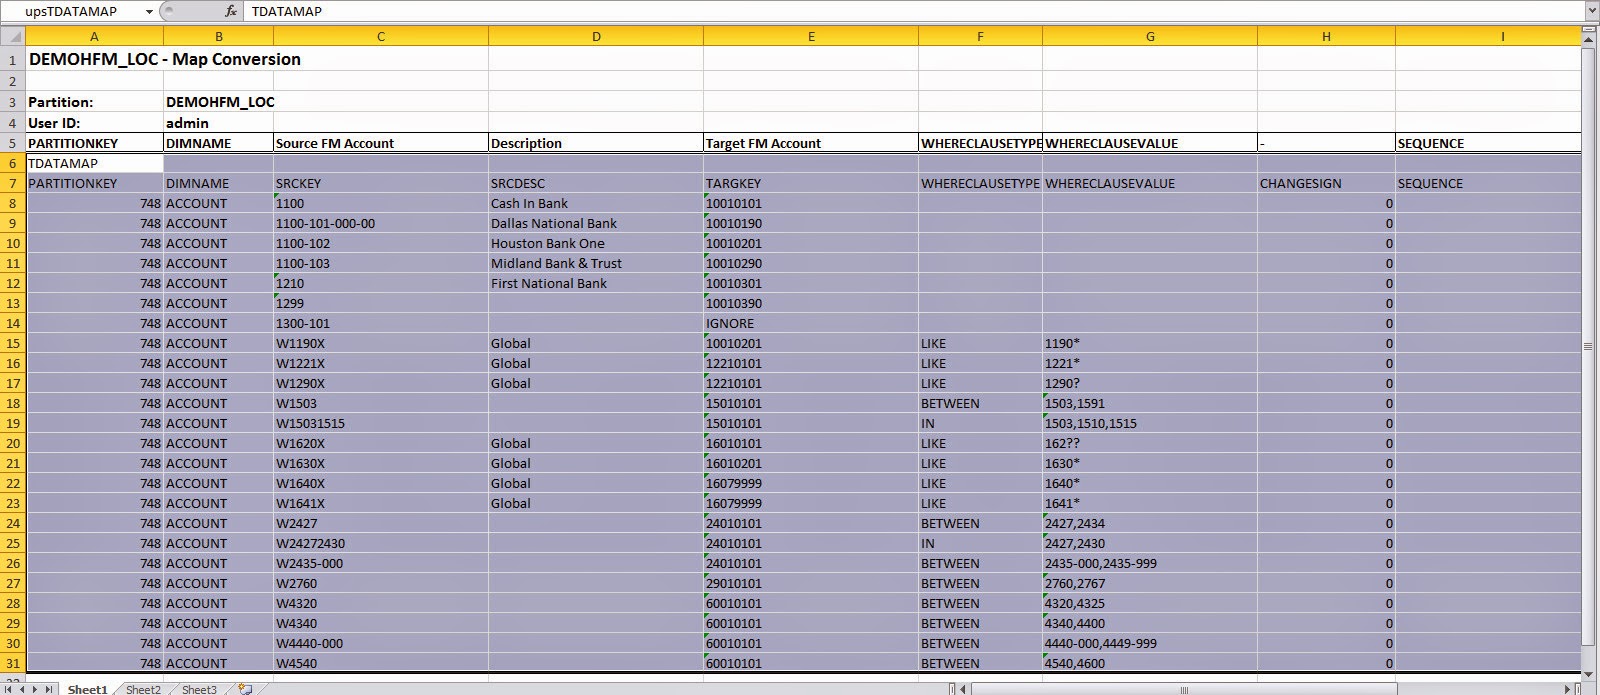
First, we can export the mapping table to Excel by clicking a button.


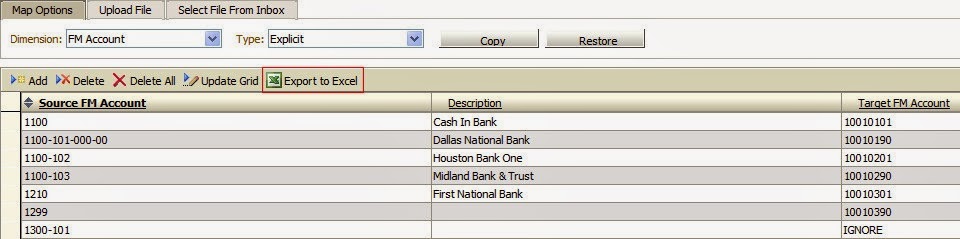
After the exporting, you can open the Excel file.


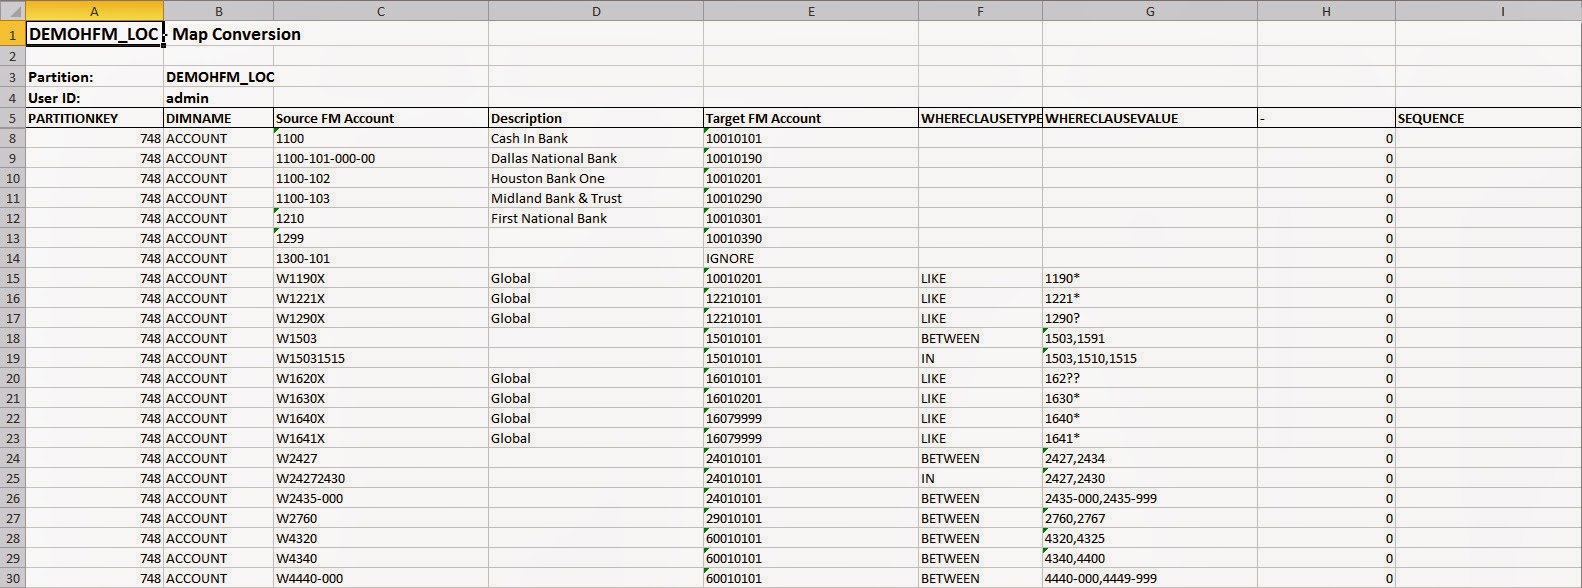
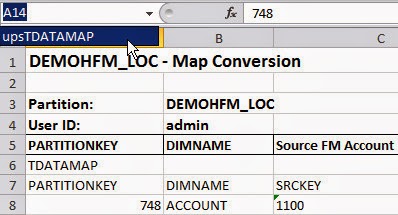
You can find there two rows are hidden in this Excel, unhide these rows.


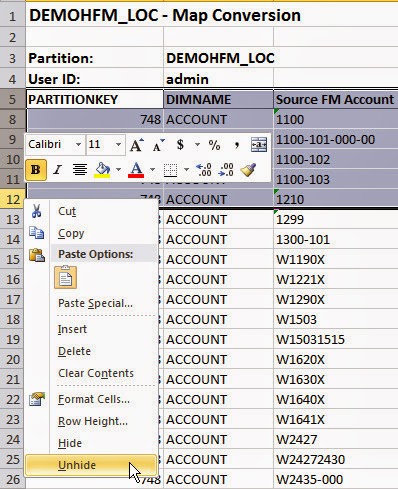
You can find the hidden information as below. Actually, it's the table name and the field names of each column. Don't try to edit these two rows.


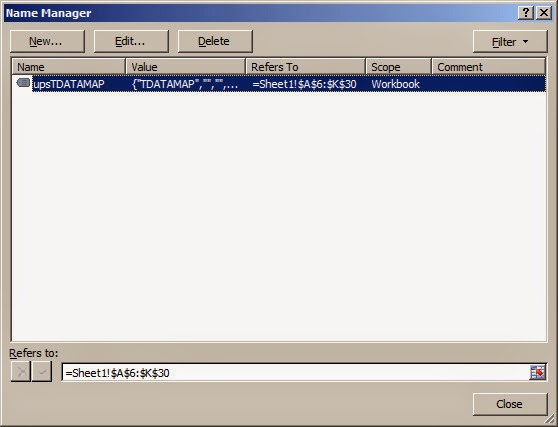
In the Excel upper left corner, it's the name box. You can select a name called upsTDATAMAP in this file.


It's the range definition which will be used for import in the later.


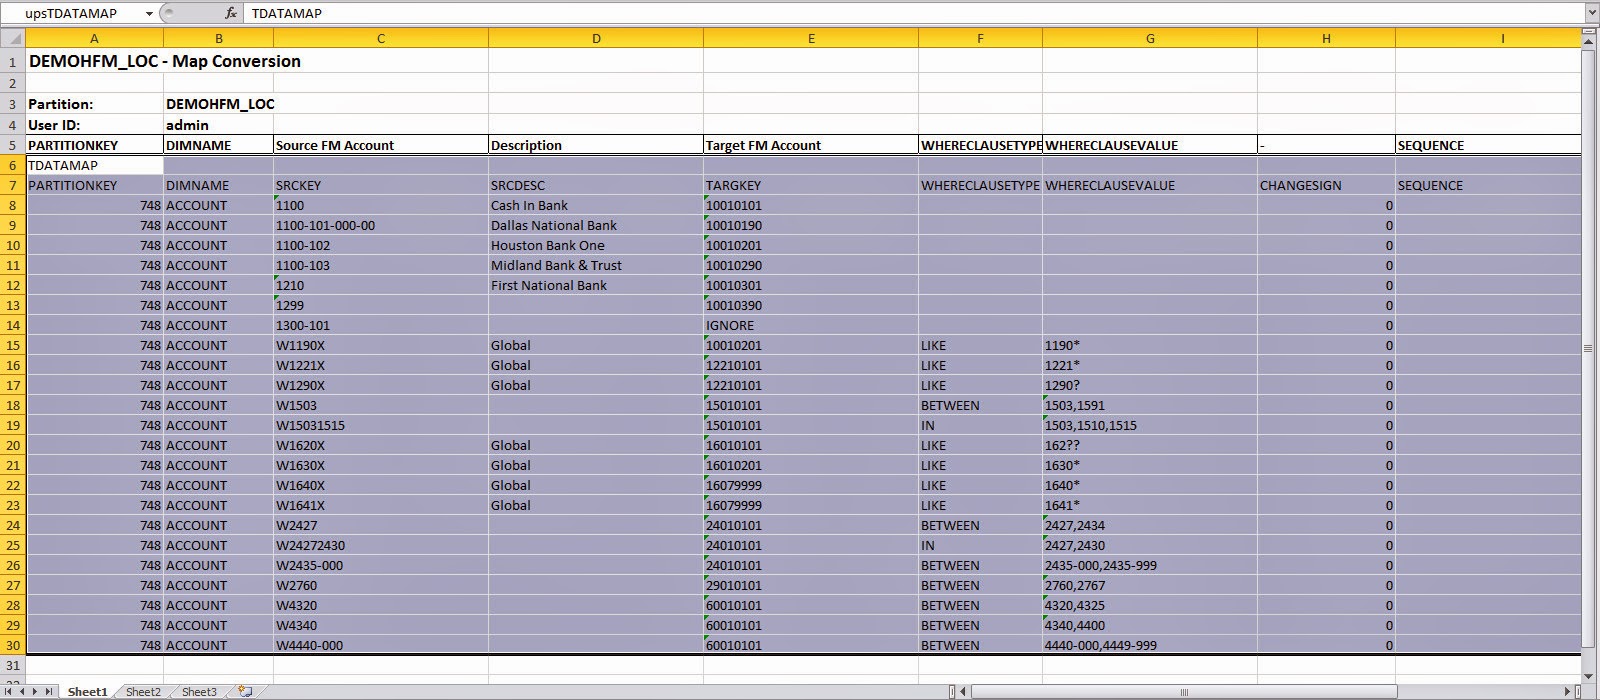
You can try to add a row in the end of the existing records to define a new mapping.


Then you need to navigate to Name Manager under the menu Formulas.


You can find the original range of upsTDATAMAP here.


Update the range to cover the new added row.


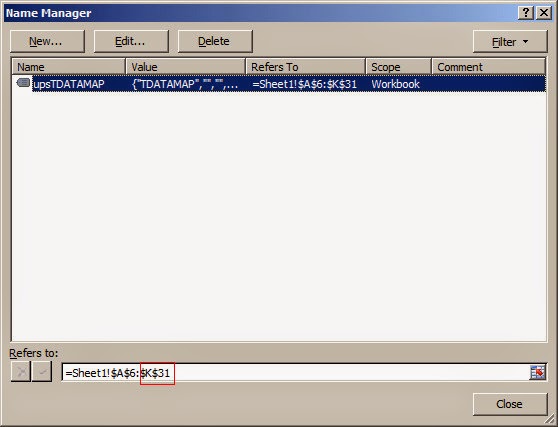
Then you can find the upsTDATAMAP's range has been updated as below.


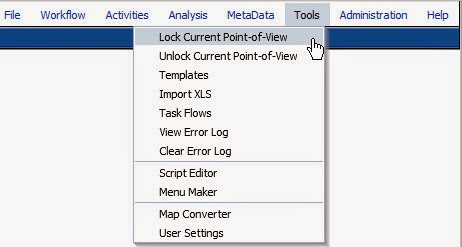
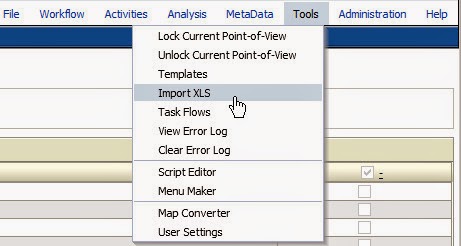
Return to FDM application, click the menu Tools and then Import XLS.


Select the Excel file we updated before.
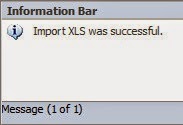

Click Import


Shows the following information.


You can find the record can be added successfully.


Actually, you can use this method to import any other objects that can be exported from the FDM application. (e.g. Control Tables, Import Formats...)

FDM - Lock Options

For the classic FDM applications, you can find many "Lock" options in the menus. Let me introduce these kinds of options one by one.

1. Lock the system so that all the basic users cannot login.

In the POV bar, click "Open"


Then a window will pop up, check the box System Lock on and then click OK


Then you can find "Open" became "Locked" in the POV bar


When basic users try to login the system, the following error will occur.


2. Lock the POV so that all the basic users cannot change

Click the menu "Administration" and then "Point-of-View Mode Lock"


Check the On/Off box and then OK


Shows the following message.


When basic users try to change the period,


Shows the following message, and the period cannot be changed.


But the locations can still be changed.


3. Lock all the locations' current POV, so that all the users cannot import data.

Click the menu "Administration" and then "Lock All Locations (Current Category/Period)"


Confirm the POV and click Yes


You can find a lock icon for all the locations in the current POV as below.


When users try to import data (Including the admin users), the following error will show


4. Lock the current location's current POV, so that all the users cannot import data.

Click the menu "Tools" and then "Lock Current Point-of-View"


You can find a lock icon for the current location and the current POV as below.


And then you can't import data as below.


Wednesday, November 19, 2014

Hyperion Planning - Date Function

Hyperion Planning has the ability to input data in "Date" format, but actually the data store in Essbase is still a number with the format "YYYYMMDD", not a real date type of data. In a real case, a client wants to calculate the interval days between two given days input in Hyperion Planning. I searched some blogs to introduce using CDF to calculate the difference, but I am not good at CDF and I tried to calculate it with the following basic functions.
  • @DATEDIFF
  • @DATEPART
  • @DATEROLL
  • @FORMATDATE
  • @TODATE
  • @TODATEEX
  • @TODAY
Please find the code as below,

The calculation logic is as below,

1. "Start Date", "End Date" are the dates input in Hyperion Planning, and they are stored in Essbase with "YYYYMMDD" format as numbers. To explain more easily, we assume
  • sDate = "Start Date" = 20130101
  • eDate = "End Date" = 20141120

2. Then we need to breakdown the date into its elements (Year, Month and Day), with the calculation above, we can calculate
  • sYear = 2013
  • sMonth = 1
  • sDay = 1
  • eYear = 2014
  • eMonth = 11
  • eDay = 20

3. Next step, we will translate the "Start Date" and "End Date" from number format to a date format with @DATAROLL function. The logic is, we set a start date 2000-01-01, and then roll the number of years (sYear - 2000), number of months (sMonth - 1) and number of days (sDay - 1) as the intervals. So that we can get the following result,
  • StartDate = 2013-01-01 (Date format)
  • EndDate = 2014-11-20 (Date format)

4. Last step, we just need to use @DATADIFF function to calculate the difference of two dates (StartDate and EndDate)
  • nDay = 689
/*-----------------------------------------------------------------------------------------------------------------*/


Another use case is, if we want to get the number of year, month and days of the month for the current point of view. For example, if the POV is FY14, Nov, it need to return three numbers 2014, 11 and 30.

Let's create three dynamic members: nYear, nMonth and nDay. The member formulas are as below, (Assume the Planning application start year is FY05)

  • nYear
2004+@COUNT(SKIPNONE,@ILSIBLINGS(@CURRMBR("Year")));

  • nMonth
IF (@ISMBR("Jan"))
 1;
ELSEIF (@ISMBR("Feb"))
 2;
ELSEIF (@ISMBR("Mar"))
 3;
ELSEIF (@ISMBR("Apr"))
 4;
ELSEIF (@ISMBR("May"))
 5;
ELSEIF (@ISMBR("Jun"))
 6;
ELSEIF (@ISMBR("Jul"))
 7;
ELSEIF (@ISMBR("Aug"))
 8;
ELSEIF (@ISMBR("Sep"))
 9;
ELSEIF (@ISMBR("Oct"))
 10;
ELSEIF (@ISMBR("Nov"))
 11;
ELSEIF (@ISMBR("Dec"))
 12;
ENDIF

  • nDay
IF (@ISMBR("Jan","Mar","May","Jul","Aug","Oct","Dec"))
 31;
ELSEIF (@ISMBR("Feb"))
 IF ("nYear"/4 == @INT("nYear"/4))
  29;
 ELSE
  28;
 ENDIF
ELSEIF (@ISMBR("Apr","Jun","Sep","Nov"))
 30;
ENDIF

The result is as below,

Monday, November 17, 2014

Essbase - Load and Export SQL Data

Essbase can load and export data from/to relational database directly. Need to configure the ODBC driver before the data load and export.


  • Configuring Data Sources on Windows
In the Windows Server, select Start, then Administrative Tools, and then Data Sources (ODBC).


Select "System DSN", you can find a system data source called ODS was already here. It is the DataDirect ODBC drivers provided by the Essbase installation. You can click "Add..." to add another data source.


If your data source is Oracle, select DataDirect 7.0 Oracle Wire Protocol (Or other data source for other database) and then click "Finish".


In the General Tab, input the Data Source Name, Host, Port Number and SID.


Switch to Security Tab, input the User Name here. And then click "Test Connect" for testing.


Input the Password and then click "OK"


It shows the following message if the information is correct. Click "OK" to continue.


Click "OK" to confirm, and then you can find the new added data source.


  • Configuring Data Sources on UNIX (Version 11.1.2.3)
In the UNIX server, open the $ARBORPATH/bin/.odbc.ini file and add or change the data source configuration. Make sure the data source name is under [ODBC Data Sources] and it invokes the correct database driver. For example.

[ODBC Data Sources]
Oracle Wire Protocol=DataDirect 6.1 Oracle Wire Protocol

Roll down to the [Oracle Wire Protocol] part. If you have another name of the data source, copy this part of configuration and then rename it.

Change the configuration for the HostName, LogonID, Password, PortNumber and SID.

Then we can try to load data from SQL in EAS. Login to EAS, create a rules file for the target database.

Click File > Open SQL in the rules file.

Confirm the target database information and then click OK to continue.

You can find the SQL data sources you created before. Select Oracle Wire Protocol, input the SQL statement for the source data. And then click "OK/Retrieve" to retrieve data.


For Oracle database, you can use Oracle Call Interface (OCI) as an alternative to ODBC to significantly improve data load and dimension build performance. Use the following syntax for the Data Source Name: host:port/Oracle_service_name


Input User name and Password for the SQL. Then click OK.

You can find the source data can be retrieved in the rules file. Actually, the field names of the SQL table will be generated to the field name of the rules file automatically. Click "Field Properties" to have a check.

You can do some simple mappings in the Global Properties Tab.

Switch to the tab "Data Load Properties", you can check or change the field definition here.

Press "Next >>" for the other fields, make sure to check the box "Data field" for the data field. Then click "OK" to continue.

Click "Data source properties" to change the data source properties, normally it doesn't need to change if the source is relational database. (It may need to change the settings for the flat file source.)

Click "Data load settings" for the data load configurations.

There are three data load options in "Data Load Values" tab, normally we use the setting of "Overwrite existing values". But in some cases if there are duplicated dimension combination records in the source data and we want to aggregate the data together, we use "Add to existing values" option.

If we want to clear data combinations before the data load, switch to the "Clear Data Combinations" tab. For the cases if the source data changed frequently and we need to reload data after the change, we will need to clear the existing data first and then reload the data again, make sure there is no dirty data left in the target environment. Select the Combinations to clear from the Dimension list and then continue.

"Header Definition" - If the number of fields of the source data is less then the dimension numbers of the target Essbase cube, you need to define the header definition. For example, if you have no version field in the source data, but you have the "Version" dimension in the target Essbase cube. Then you need to specify one of the version to load the data. (e.g. Final)

After all the settings are done in the rules file, you can save to continue.

Input the File name and click "OK"

Now we can load the data from the relational database with the saved rules file. Right click the target database, click "Load data..."

Select SQL as the Data Source...and then click "Find Rules File"

Select the rules file we created before.

Then scroll to the right of the Data Load setting, input the SQL User Name and Password, click "OK"

The data load log shows as below.

You can find the data was loaded to Hyperion Planning/Essbase successfully.

Next, we can try how to export Essbase data to relational database with DATAEXPORT command in a calculation script. First, create a calculation script as below.

We can export Essbase data to relational database with the following command. "Oracle Wire Protocol" is the ODBC driver we created before, and we also need to specify the table name, user name and password of the target database.

Save the script and then execute, you can find the data output to the relational database successfully.