Thursday, July 16, 2015

FDMEE - Import Mappings

Because FDM Classic will no longer be available in version 11.1.2.4, more and more clients would prefer to implement FDMEE even they are using version 11.1.2.3. Although FDMEE is very similar with FDM Classic in concept, they still have some small differences. For example, FDMEE is an entire web-based application, it doesn't need the FDM client like Workbench. Today, I will explain some minor differences in the mapping tables import step.

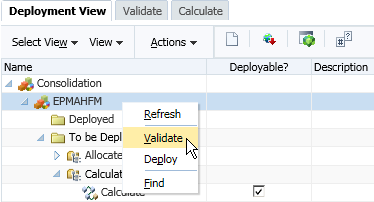
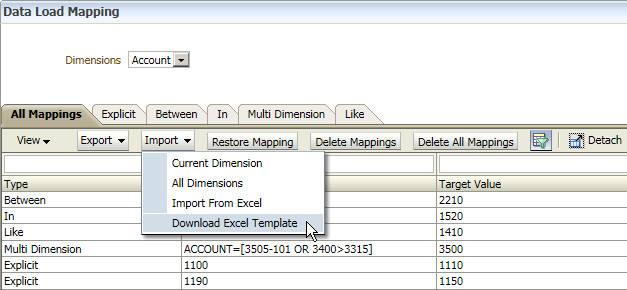
FDMEE is integrated into EPM workspace platform already, but it is called "Data Management" in this version (11.1.2.3.500). We can locate to Data Load Mapping in the Workflow tab, and you can find all the existing Account mappings here.


In the Import drop down box, you can find the mapping table import Excel template can be downloaded here. Click "Download Excel Template"  to download it.


After the download, you can open the file as below. Actually, it is quite similar with the MapLoader in our FDM Classic version.


You can find there are two rows hidden in the MapLoader file, which stands for the table name and field names of RDBS table. Same as before.


And also you can find the "upsMap" in the Name box, it will cover the range for the import.


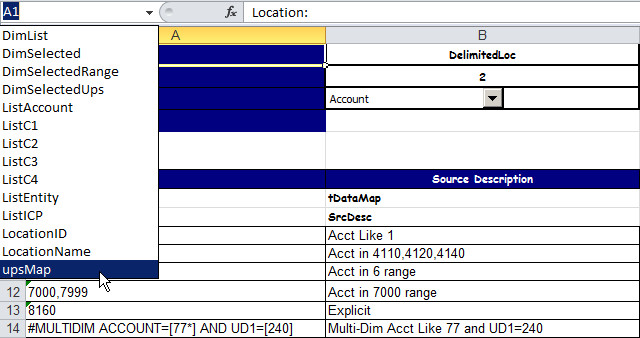
But you can find there is one more row (Row 6) is covered in the upsMap range like a header definition, which is not covered in the FDM Classic version. It is very important for FDMEE mapping table import, we must follow this rule to insert the header row before the table name's row (Row 7, tDataMap) in the upsMap name definition, even it is a blank one.


As I said in another blog post, if you don't like to use the MapLoader, you can simplify it to your own custom import Excels, just follow the rules above. For example, you can custom the Excel to this.


Remember to define the upsMap Name to cover all the related information. (Header, RDBS table information, and mapping table records.)


The first column PartitionKey is a unique key for each location, you can find it in the Location Setup page.


You can hide the RDBS table information rows, and then save the file.


The other difference between FDMEE and FDM Classic is that you can't load your local PC's file to maintain the mapping tables directly in FDMEE. Every time you change the mapping table import Excel, you need to upload it to the FDMEE target application's root folder in your FDMEE server first, and then you can import it to update the mapping tables.


You can find where is your target application's root folder in the Application Settings' page.


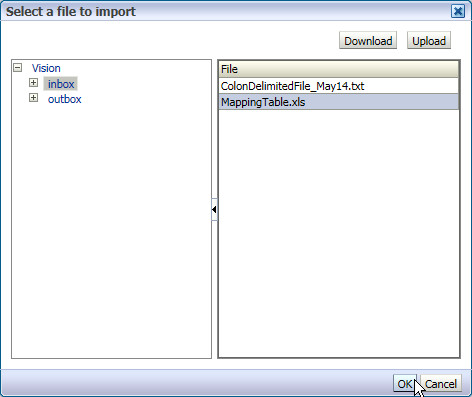
Now you can import the mapping table from Excel now, click "Import From Excel" as below.


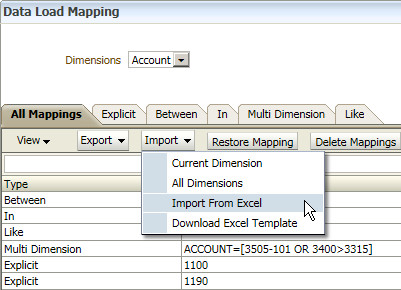
You can find the Excel file you just copy it to the target application's folder.Click OK to continue. (Or you can Upload your local file here by clicking "Upload" button.)


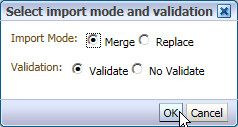
Select "Merge" Import Mode and "Validate" to continue.


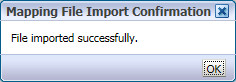
Then you can find the file imported successfully.


You can find your Account mapping table is updated as below.

Thursday, April 16, 2015

HFM - Calculation Manager

Calculation Manager and load rule directly in HFM are two methods for HFM rules management. Both of them can work for EPMA and classic HFM. Now today I start to explore the calculation manager usage for HFM.

Open the Calculation Manager and you will find each HFM application contains the folders which are almost the same with HFM's standard rule types.


Expand the Calculate one, we can create a new rule here.


Input the rule's name, and then click OK. Actually it is a sub routine of the main calculate procedure.


The designer mode is a graphical one, you can drag and drop the objects such as Formula and Condition in it.


For example, we can drag a Condition object and drop in the designer.


Click the Add Condition button.


Then we can select a Function here.


For example, we can select the @Value.Currency function here, click OK to continue.


Select a Member for the Value.


Select the member <Entity Currency> in Value Dimension, and then click OK to continue.


Click Add to add this Metadata Condition.


Then you can find the condition is added as below, click OK to continue.


Then it will return to the designer mode, click Save to save it first.


The following information shows, click OK to continue.


Then you can switch to Edit Script mode, to see what's happening for the script.


You can find the rule's script is as below.


Switch it back to Designer mode, drag and drop a Formula object to the "Y" condition.


You can find the object is added here, select Member for the Formula. By default, it will generate an HS.Exp expression for the direct member selection.


Select the member for the formula, click OK to continue.


And then you can select the Variable, Member or Function in the right-hand side for the formula, or only input a number in it. Then click Validate and Save.


The following message shows. Click OK to continue.


So a new rule has been created successfully. Let's move on to create a new ruleset.


Ruleset is the main rule type of the HFM rule, depends on where you create the ruleset it will return to the corresponding rule type. In this case, we create the ruleset under the Calculation folder, so no matter which name we named it, it will return to Sub Calculate() in the HFM rule at the end.


Then you can drag the rule created before and drop it under the new ruleset. Click Save to continue.


Return to the System View of the Calculation Manager. Switch to Deployment View as below.


Expand the "To be Deployed" items, you can find only rulesets can be checked the Deployable CheckBox. Check it on for the Calculation one. (It is a very important step to make the ruleset as deployable.) By default, all the rulesets are not deployed and not validated.


Right-click the HFM application, then you can Validate all the rules at the same time.


Right-click the HFM application again, then we can deploy all the rules this time.


The following message shows, means the deployment is success. Also, you can deploy the rules in the EPMA application library if it is an EMPA application.


Then let's open the HFM application to double check the deployment. Click Extract Rules in the Extract Application Elements page.


The following messages shows, click OK to continue.


Click Download to download the HFM rule.


Then you can open the rule in a text editor. You can find the ruleset is a main rule type and the rule is a sub routine which can be called by the ruleset/main rule type.


Summary

  • Rulesets are corresponding to the main standard rule types of HFM (Calculate, Consolidate, Dynamic, Input, NoInput, Translate...)
  • Rules are the sub routines which can be called by the rulesets
  • Mark the rulesets as Deployable, make sure only one ruleset is deployable for each main rule types